ShowProgramCode

顯示具有 C# 標籤的文章。 顯示所有文章

2024年6月21日 星期五

C# .Net6 Json欄位大小寫依照物件屬性

一個小問題,Net Core6預設當物件轉為Json時,所有屬性名稱全小寫。
但是我希望能夠依照物件屬性名稱的設定,也就是多數首字大寫。

最後在Program.cs修改如下:

public class Program
{
    public static void Main(string[] args)
    {
        var builder = WebApplication.CreateBuilder(args);
        // Add services to the container.
        ...
        //setting json
        //System.Text.Json 在序列化的時候使用了 camelCase 的命名規範,這意味著首字母小寫。添加下列設定可以讓Json依照DTO屬性
        //AddNewtonsoftJson則是 Newtonsoft.Json 序列化器的設定方式
        builder.Services.AddControllers()
        .AddJsonOptions(options =>
        {
            // 或者使用 JsonNamingPolicy.CamelCase
            options.JsonSerializerOptions.PropertyNamingPolicy = null; 
        });
    
        builder.Services.AddControllers();
        ...
    }
}

C# Net6 WebAPI專案自動跳轉https

最近遇到一個小問題,依照需求專案放上IIS必須走http,但是.NetCore6又預設會跳轉到https。
造成我的前端連線過來時,因為沒有憑證而連線失敗。

最後,我在Program.cs把自動跳轉移除,並加入http設定如下:

public class Program
{
    public static void Main(string[] args)
    {
        var builder = WebApplication.CreateBuilder(args);
        // Add services to the container.

        builder.Services.AddControllers();
        ...

        var app = builder.Build();
        ...

        //設定http管道
        app.UseRouting();

        //註銷不轉向https
        //app.UseHttpsRedirection();

        app.UseAuthorization();

        app.MapControllers();

        app.Run();
    }
}

2023年7月4日 星期二

C# Net6 XML轉物件 錯誤訊息 ... xmlns='' was not expected

今天遇到需要將DTO與XML相互轉換,但卻一直遇到狀況。
後續處理完畢,特別紀錄一下。

XML:

<massege>
<header code="OTP" id="PUSID">
<from>127.0.0.1</from>
<to>255.0.0.0</to>
</header>
<body>
訊息內容
</body>
</message>

DTO:

[XmlTypeAttribute(AnonymousType = true)]
[XmlRootAttribute(Namespace = "", IsNullable = false, ElementName = "message")]
public class TestMessage
{
	public TestMessageHeader header{get;set;}
	public string body{get;set;}
}

[XmlTypeAttribute(AnonymousType = true)]
public class TestMessageHeader
{
	[XmlAttributeAttribute()]
	public string code { get; set; } = string.Empty;
	[XmlAttributeAttribute()]
	public string id { get; set; } = string.Empty;
	public string from {get;set;} = string.Empty;
	public string to{get;set;} = string.Empty;
}

程式碼:

public static string XmlToDto<T>(string xml, ref T obj) where T : class
{
	XmlSerializer Serializer = new XmlSerializer(typeof(T));
	try
	{
		using (StringReader reader = new StringReader(xml))
		{
			obj = (T)Serializer.Deserialize(reader);
		}

		return "0000";
	}
	catch (Exception ex)
	{
		return ex.Message;
	}
}

public static string XmlToDto<T>(string xml, string rootTag, ref T obj) where T : class
{
	XmlSerializer Serializer = new XmlSerializer(typeof(T), new XmlRootAttribute(rootTag));
	try
	{
		using (StringReader reader = new StringReader(xml))
		{
			obj = (T)Serializer.Deserialize(reader);
		}

		return "0000";
	}
	catch (Exception ex)
	{
		return ex.Message;
	}
}

參考網頁:https://dotblogs.com.tw/initials/2020/11/18/184450

2023年6月14日 星期三

C# Net6 WebAPI或MVC架構下 Nlog+EFCore+MSSQL設定 自動記錄SQL命令

首先建立一個Net6 WebAPI或MVC專案

下面使用WebAPI專案作為示範,不過MVC專案設定大致相同,除了不需要手動增加Model資料夾...

一、設定Nlog

1.使用NuGet管理員,下載NLog.Web.AspNetCore,此次使用版本5.3.0。

2.在專案中手動增加nlog.config檔案。

記得必須選擇"永遠複製"到輸出目標。
<?xml version="1.0" encoding="utf-8" ?>
<nlog xmlns="http://www.nlog-project.org/schemas/NLog.xsd"
xmlns:xsi="http://www.w3.org/2001/XMLSchema-instance"
autoReload="true"
internalLogLevel="Error">
<!-- 啟用 ASP.NET Core layout renderers -->
<extensions>
<add assembly="NLog.Web.AspNetCore"/>
</extensions>
<!-- 設定log根目錄 -->
<variable name="logDirectory" value="C:\TWBank_Log\NlogTest" />
<!-- log 儲存目標 -->
<targets>
<target xsi:type="File" name="allfile" fileName="${logDirectory}\nlog-all-${shortdate}.log"
layout="${date:format=HH\:mm\:ss\.ffff} [thread:${threadid}] ${level:uppercase=true} ${message} ${exception:Format=ToString}" createDirs="true" encoding="UTF-8" />
</targets>
<!-- 設定 logger 名稱與 log 儲存目標的對應 -->
<rules>
<!--將Microsoft與System.Net.Http的錯誤拿掉不紀錄-->
<logger name="Microsoft.*" maxlevel="Info" final="true" />
<logger name="System.Net.Http.*" maxlevel="Info" final="true" />
<logger name="*" minlevel="Trace" writeTo="allfile" />
</rules>
</nlog>

3.修改Program.cs

public class Program
{
	public static void Main(string[] args)
	{
		var builder = WebApplication.CreateBuilder(args);

		//將NLog註冊到此專案內
		builder.Logging.ClearProviders();
		builder.Host.UseNLog();

		...
		var app = builder.Build();
		
		...
		app.Run();
	}
}

4.調整appsettings.json

Logging.LogLevel.Default可以控制預設紀錄的Log層級,目前Trace是最低層級,也就是什麼都會記錄。
{
  "Logging": {
    "LogLevel": {
      "Default": "Trace",
      "Microsoft.AspNetCore": "Warning"
    }
  },
  "AllowedHosts": "*"
}

5.修改範本Controller程式碼

Nlog支援將List、物件等,轉換成json string顯示,參考下方程式碼。
[HttpGet(Name = "GetWeatherForecast")]
public IEnumerable<WeatherForecast> Get()
{
	IEnumerable<WeatherForecast> temp = Enumerable.Range(1, 5).Select(index => new WeatherForecast
	{
		Date = DateTime.Now.AddDays(index),
		TemperatureC = Random.Shared.Next(-20, 55),
		Summary = Summaries[Random.Shared.Next(Summaries.Length)]
	})
	.ToList();
	_logger.LogDebug("WeatherForecast List = {@temp}", temp);
	return temp;
}

6.確認Log內容

二、設定EFCore,此處設定MSSQL,如果要設定不同資料庫,下載與設定方式會略有不同。

1.使用NuGet管理員,下載EFCore。

  • Microsoft.EntityFrameworkCore
  • Microsoft.EntityFrameworkCore.Sqlite

2.手動增加Model資料夾,並在內部加入MyDbContext繼承DbContext

public class MyDbContext: DbContext
{
	public MyDbContext(DbContextOptions<MyDbContext> options) : base(options)
	{
	}
	public DbSet<TestUser> User { get; set; }
}

[Table("TestUser")]
public class TestUser
{
	[Key]
	public int Id { get; set; }
	[Required]
	[StringLength(20)]
	public string Name { get; set; } = string.Empty;
	[Required]
	[StringLength(15)]
	public string Phone { get; set; } = string.Empty;
}

3.修改appsettings.json

設定遠端資料庫連線。
開發期間資料庫證書無法設定時,可以添加這個設定,TrustServerCertificate=true,將無條件信任IIS預設證書。
此外,還需要加上Logging設定中Microsoft.EntityFrameworkCore.Database.Command設定,並且在nlog.config必須一起設定。
{
  "ConnectionStrings": {
    "DefaultConnection": "server=資料庫IP;user id=資料庫帳號;password=資料庫密碼;database=資料庫名稱;TrustServerCertificate=true"
  },
  "Logging": {
    "LogLevel": {
      "Default": "Trace",
      "Microsoft.AspNetCore": "Warning",
      "Microsoft.EntityFrameworkCore.Database.Command": "Information"
    }
  },
  "AllowedHosts": "*"
}

4.調整nlog.config檔案。

針對Microsoft.EntityFrameworkCore.Database.Command設定
<?xml version="1.0" encoding="utf-8" ?>
<nlog xmlns="http://www.nlog-project.org/schemas/NLog.xsd"
xmlns:xsi="http://www.w3.org/2001/XMLSchema-instance"
autoReload="true"
internalLogLevel="Error">
...
<!-- 設定 logger 名稱與 log 儲存目標的對應 -->
<rules>
<!--寫入SQL-->
<logger name="Microsoft.EntityFrameworkCore.Database.Command" minlevel="Info" writeTo="allfile" />
...
</rules>
</nlog>

5.修改Program.cs

增加EFCore設定。
public class Program
{
	public static void Main(string[] args)
	{
		var builder = WebApplication.CreateBuilder(args);
		
		//註冊EFCoreContext
		//先注入EFCore再注入Nlog才會記錄SQL命令
		string connectString = builder.Configuration.GetConnectionString("DefaultConnection");
		builder.Services.AddDbContext<MyDbContext>(options => options.UseSqlServer(connectString));

		//將NLog註冊到此專案內
		builder.Logging.ClearProviders();
		builder.Host.UseNLog();

		...
		var app = builder.Build();
		
		...
		app.Run();
	}
}

6.修改範本Controller程式碼

private readonly ILogger<WeatherForecastController> _logger;
private readonly MyDbContext _dbContext;

public WeatherForecastController(MyDbContext dbContext,ILogger<WeatherForecastController> logger)
{
	_dbContext = dbContext;
	_logger = logger;
}

public IEnumerable<WeatherForecast> Get()
{
IEnumerable<WeatherForecast> temp = Enumerable.Range(1, 5).Select(index => new WeatherForecast
{
Date = DateTime.Now.AddDays(index),
TemperatureC = Random.Shared.Next(-20, 55),
Summary = Summaries[Random.Shared.Next(Summaries.Length)]
})
.ToList();

IEnumerable<TestUser> temp2 = _dbContext.User.ToList();

_logger.LogDebug("WeatherForecast List = {@temp}", temp);
_logger.LogDebug("TestUser List = {@temp}", temp2);
return temp;
}

7.確認Log內容與資料庫比對

Log內容:
資料庫內容:

由此可以確認資料庫中的內容與Log TestUser是一致的。
此外,如果Log內容不正確,可以將專案清除再重建,可能是什麼被cache造成的。

2022年12月30日 星期五

C# .Net Core6 多執行緒處理ThreadPool PartII

從上一篇可知ThreadPool的基本設定了,不過接下來又遇上新的問題。

  1.  如何確認所有執行緒完成?
  2.  將主控台專案改為WinForm專案使用ThreadPool...

首先,先說明如何確認所有執行緒完成工作?
在此我使用者WaitHandle.WaitAll()來確認。
依照官網的說明,必須將doneEvent = new ManualResetEvent(false)帶入ThreadPool,最終使用doneEvent陣列帶入WaitHandle.WaitAll()即可。
二話不說,先上程式碼。

internal class Program
{
    static void Main(string[] args)
    {
        const int FibonacciCalculations = 10;
        firtstTest(FibonacciCalculations);
    }
    
    private static void ThreadPoolCallbackV1(object obj)
    {
        if(obj == null) return;
        ManualResetEvent doneEvent = (ManualResetEvent)obj;
        Console.WriteLine(nameof(ThreadPoolCallbackV1));
        doneEvent.Set();
    }
    
    private static void firtstTest(int theadCount)
    {
        ThreadPool.SetMinThreads(2, 2);
        ThreadPool.SetMaxThreads(3, 3);
        ManualResetEvent[] doneEvents = new ManualResetEvent[theadCount];
        for(var i = 0; i < theadCount; i++)
        {
            doneEvents[i] = new ManualResetEvent(false);
            Console.WriteLine($"{nameof(firtstTest)} 第 {i} 次執行...");
            ThreadPool.QueueUserWorkItem(ThreadPoolCallbackV1, doneEvents[i]);
        }
        
        WaitHandle.WaitAll(doneEvents);
        Console.WriteLine("All calculations are complete.");
    }
}

是的,這個是主控台的程式碼,當所有執行緒完成後,才會印出最後一個句子。

接下來的問題,就是要把這段程式碼改道WomForm的專案了...
最剛開始,我想...在主控台都測通過了,沒有問題。於是,隨便開了個空的Form表單,就把程式碼貼過去了。
結果? 當然是失敗了...

我花了至少三天才搞定它,雖然解法非常簡單...
二話不說,先上程式碼。

Program.cs

internal static class Program
{
    /// 
    ///  The main entry point for the application.
    /// 
    //[STAThread] 將STAThread改為MTAThread,WaitHandle.WaitAll不支援STAThread,改為MTAThread就能夠執行...
    [MTAThread]
    static void Main()
    {
        // To customize application configuration such as set high DPI settings or default font,
        // see https://aka.ms/applicationconfiguration.
        ApplicationConfiguration.Initialize();
        Application.Run(new Form1());
    }
}

Form1.cs

private string _content = string.Empth;
public partial class Form1 : Form
{
    public TpcGrpcStressTest()
    {
        InitializeComponent();
    }
    
    private static void ThreadPoolCallbackV1(object obj)
    {
    	if(obj == null) return;
    	ManualResetEvent doneEvent = (ManualResetEvent)obj;
    	_content += nameof(ThreadPoolCallbackV1) + Environment.NewLine;
    	doneEvent.Set();
    }

    private static void firtstTest(int theadCount)
    {
    	ThreadPool.SetMinThreads(2, 2);
    	ThreadPool.SetMaxThreads(3, 3);
    	ManualResetEvent[] doneEvents = new ManualResetEvent[theadCount];
    	for(var i = 0; i < theadCount; i++)
    	{
    		doneEvents[i] = new ManualResetEvent(false);
    		_content += $"{nameof(firtstTest)} 第 {i} 次執行..." + Environment.NewLine;
    		ThreadPool.QueueUserWorkItem(ThreadPoolCallbackV1, doneEvents[i]);
    	}
        
        WaitHandle.WaitAll(doneEvents);
    }

    private void SubmitBtn_Click(object sender, EventArgs e)
    {
        firtstTest(10);
        TextBox1.Text = _content + "All calculations are complete.";
    }
}

答案超簡單,但困擾我許久,特別記錄下來,免得下次又發生。

參考網址: AutoResetEvent.WaitAll 等到人生三大事,然后大笑开心。


本以為到此為止,但是當我測試超過100筆執行緒時,又一個問題出現了...
System.NotSupportedException: 'The number of WaitHandles must be less than or equal to 64.'

再去查了資訊,才發現原來超過64個執行緒使用WaitHandle.WaitAll會錯誤...
實際找到解法後,說明不需要使用WaitHandle.WaitAll來檢查程序是否執行完成,那麼二話不說,修改程式碼...

Program.cs

internal static class Program
{
    /// 
    ///  The main entry point for the application.
    /// 
    [STAThread]
    static void Main()
    {
        // To customize application configuration such as set high DPI settings or default font,
        // see https://aka.ms/applicationconfiguration.
        ApplicationConfiguration.Initialize();
        Application.Run(new Form1());
    }
}

Form1.cs

public partial class Form1 : Form
{
    private string _content = string.Empth;
    private static int _numerOfThreadsNotYetCompleted = 0;
    private static ManualResetEvent _doneEvent = new ManualResetEvent(false);
    
    public TpcGrpcStressTest()
    {
        InitializeComponent();
    }
    
    private static void ThreadPoolCallbackV1(object obj)
    {
    	if(obj == null) return;
        try
        {
            ManualResetEvent doneEvent = (ManualResetEvent)obj;
            _content += $"{nameof(ThreadPoolCallbackV1)} 第 {(int)i} 次執行...") + Environment.NewLine;
            doneEvent.Set();
        }
        finally
        {
            if (Interlocked.Decrement(ref _numerOfThreadsNotYetCompleted) == 0)
                _doneEvent.Set();
        }
    }

    private static void firtstTest(int theadCount)
    {
    	ThreadPool.SetMinThreads(2, 2);
    	ThreadPool.SetMaxThreads(3, 3);
    	for(var i = 0; i < theadCount; i++)
    	{
    		_content += nameof(firtstTest) + Environment.NewLine;
    		ThreadPool.QueueUserWorkItem(ThreadPoolCallbackV1, (object)i);
    	}
        _doneEvent.WaitOne();
    }

    private void SubmitBtn_Click(object sender, EventArgs e)
    {
        _numerOfThreadsNotYetCompleted = 100;
        firtstTest(100);
        TextBox1.Text = _content + "All calculations are complete.";
    }
}

參考網址: Solved: “The number of WaitHandles must be less than or equal to 64″

2022年12月15日 星期四

C# .Net Core6 多執行緒處理ThreadPool

現行遇到一個狀況,需要使用多執行緒連線TCP Server。
原先我是想使用Thread,不過在查詢如何使用多個執行緒設定時,發現了另外一個可用的方法ThreadPool

首先是Microsoft目前並不建議直接使用Thread控制,加上ThreadPool可以直接在for迴圈內使用,自動增加多個執行緒。對於我目前要做一個壓測用的程式而言,只要在設定檔寫好測試次數或者測試時間,用for迴圈執行ThreadPool就能得到想要的結果。實在是太方便了!

不過,在這當中我遇到了一些問題,為防止自己忘記,先記錄在此。

  1.  依照說明傳入是非固定的object,該如何設為固定的物件?
  2.  設定的執行緒的最大值,但實際程式執行時,同一時間內的執行緒超過上限...

首先是關於第一項的問題,該如何將object轉為固定的物件?
關於這一點,必須先說明ThreadPool如何使用...
下面的範例是我用來測試使用的,不過後來改過,所以不確定這個是否可以執行...

static void Main(string[] args)
{
    for(var i=0;i<100;i++)
    {
        ThreadPool.QueueUserWorkItem(new WaitCallback(countIndex), i);
    }
}

private static void countIndex(object? obj)
{
    string timeStr = DateTime.Now.ToString("yyyy-MM-dd HH:mm:ss.fff");
    string msg = $"{timeStr}\t[{obj}] \t[{Thread.CurrentThread.ManagedThreadId}] \t This is Test!!";
    Console.WriteLine(msg);
}

測試沒有問題後,我發現我要帶入的是一個完整的資料格式。
我用過不少方法,都沒有成功,最後改為下面的方式就可以執行了。
不過必須要用try catch包好,物件轉換錯誤可能會讓程式整個當掉,但因為是內部使用,就沒寫那麼多防呆了。

static void Main(string[] args)
{
    for(var i=0;i<100;i++)
    {
        DTO dto = new dto;
        dto.Index = i;
        ...
        ThreadPool.QueueUserWorkItem(new WaitCallback(countIndex), dto);
    }
}

private static void countIndex(object? obj)
{
    try
    {
        //這裡的轉換物件須注意
        DTO dto = (DTO)obj;
        ...
    	string msg = getMessage(obj.Index, dto.Message);
    	Console.WriteLine(msg);
    }
    catch (Exception ex)
    {
        string msg = getMessage(0, $"error = {ex.ToString()}");
        Console.WriteLine(msg);
    }
}

private static string getMessage(int Index, string msg)
{
    string timeStr = DateTime.Now.ToString("yyyy-MM-dd HH:mm:ss.fff");
    return $"{timeStr}\t[{Index}] \t[{Thread.CurrentThread.ManagedThreadId}] \t {msg}";
}

其次是關於執行緒上限的設定...
依照我上方的程式碼,執行緒ID與Index是可以做比對的,所以我發現了在同一時間,執行緒超出我設定的上限...
當時的程式碼大致如下:

static void Main(string[] args)
{
    ThreadPool.SetMaxThreads(5, 5);
    for(var i=0;i<100;i++)
    {
        DTO dto = new dto;
        dto.Index = i;
        ...
        ThreadPool.QueueUserWorkItem(new WaitCallback(countIndex), dto);
    }
}

private static void countIndex(object? obj)
{
    try
    {
        //這裡的轉換物件須注意
        DTO dto = (DTO)obj;
        ...
    	string msg = getMessage(obj.Index, dto.Message);
    	Console.WriteLine(msg);
    }
    catch (Exception ex)
    {
        string msg = getMessage(0, $"error = {ex.ToString()}");
        Console.WriteLine(msg);
    }
}

private static string getMessage(int Index, string msg)
{
    string timeStr = DateTime.Now.ToString("yyyy-MM-dd HH:mm:ss.fff");
    return $"{timeStr}\t[{Index}] \t[{Thread.CurrentThread.ManagedThreadId}] \t {msg}";
}

但是實際執行,跳出的執行緒至少超過10個...
這和我當初想像的結果完全不同,測試過許多方法都沒有用,最後才發現只設定SetMaxThreads是不行的!
將程式碼調整成下方後,測試的結果終於與我想的相同了。Thread.CurrentThread.ManagedThreadId出現的號碼只有設定的數量,同一個時間執行緒也不會超過上限...

static void Main(string[] args)
{
    //min & max 必須同時設定才有效...
    ThreadPool.SetMinThreads(2, 2);
    ThreadPool.SetMaxThreads(5, 5);
    for(var i=0;i<100;i++)
    {
        DTO dto = new dto;
        dto.Index = i;
        ...
        ThreadPool.QueueUserWorkItem(new WaitCallback(countIndex), dto);
    }
}

private static void countIndex(object? obj)
{
    try
    {
        //這裡的轉換物件須注意
        DTO dto = (DTO)obj;
        ...
    	string msg = getMessage(obj.Index, dto.Message);
    	Console.WriteLine(msg);
    }
    catch (Exception ex)
    {
        string msg = getMessage(0, $"error = {ex.ToString()}");
        Console.WriteLine(msg);
    }
}

private static string getMessage(int Index, string msg)
{
    string timeStr = DateTime.Now.ToString("yyyy-MM-dd HH:mm:ss.fff");
    return $"{timeStr}\t[{Index}] \t[{Thread.CurrentThread.ManagedThreadId}] \t {msg}";
}

參考網址:
Microsoft官網說明
kinanson的技術回憶
安德魯的部落格
余小章 @ 大內殿堂
玩轉C#之【執行序-實際實作】
C# .NET Blazor MAUI Xamarin Research

C# .net Core6 主控台使用強行別讀取 AppSetting.json

在主控台讀取設定檔有兩種格式:
  1.  .Xml
  2.  .Json
現在我要記錄的是第二種.json的格式該如何在主控台的專案使用強型別讀取。
首先,在專案的最上層新增一個appsetting.json檔案
接著,新增一個物件檔,處理設定檔的讀取。
internal class ConfigHelp
{
    private readonly IConfigurationRoot config;
    public ConfigHelp()
    {
    	config = new ConfigurationBuilder()
        .SetBasePath(Directory.GetCurrentDirectory())
        .AddJsonFile("appsetting.json", true)
        .Build();
    }
    
    public void Get<T>(string configName, ref T resp)
    {
    	config.GetSection(configName).Bind(resp);
    }
    
    public string? Get(string configName)
    {
    	return config[configName];
    }
}
appsetting.json檔案
{
  "Setting": {
    "MinThreads": 2,
    "MaxThreads": 3,
    "TestTimes": 300
  }
}
設定檔的DTO
public class Setting
{
    public int MinThreads { get; set; }
    public int MaxThreads { get; set; }
    public int TestTimes { get; set; }
}
實際主控台程式讀取。
internal class Program
{
    private static Setting setting = new Setting();
    static void Main(string[] args)
    {
    	ConfigHelp config = new ConfigHelp();
        config.Get("Setting", ref setting);
    }
}

2022年8月5日 星期五

C# 連結Golang的Grpc Server

Grpc Client專案要如何設定,請參考之前的文章
這裡主要說明的是如何使用C# .NetCore作為Client連結Golang的Grpc Server。

Golang Grpc Server proto調整

syntax = "proto3";  // 定義要使用的 protocol buffer 版本

option csharp_namespace = "GrpcTestApi";

package grpcServer;  // for name space
//option go_package = "./;grpcServer";  // generated code 的 full Go import path

message SumRequest {
  repeated int64 input = 1 [packed=true];
}

message SumResponse {
  int64 result = 1;
}

message RemainderRequest{
  int64 a = 1;
  int64 b = 2;
}

message RemainderResponse {
  int64 result = 1;
}

service grpcService {
  rpc Sum(SumRequest) returns (SumResponse) {};
  rpc Remainder(RemainderRequest) returns (RemainderResponse) {};
}

連線Grpc Client Help物件

public class GrpcServerConnectHelp
{
    private string serverUrl;
    private grpcService.grpcServiceClient client;

    public string ServerUrl { get { return serverUrl; } }

    public GrpcServerConnectHelp()
    {
        Init(System.Configuration.ConfigurationManager.AppSettings.Get("GrpcServerUrl"));
    }

    public void Init(string url = null)
    {
        if (string.IsNullOrEmpty(url))
            return;

        serverUrl = url;
        //.NetCore 3.*版本必須加入此行,否則會錯誤。
        AppContext.SetSwitch("System.Net.Http.SocketsHttpHandler.Http2UnencryptedSupport", true);
        var channel = GrpcChannel.ForAddress(serverUrl);
        client = new grpcService.grpcServiceClient(channel);
    }

    public string CommonApi(string method, string input)
    {
        string resp = "查無此函式";

        if (method.Equals("Sum"))
        {
            return Sum(input);
        }

        if(method.Equals("Remainder"))
        {
            return Remainder(input);
        }

        return resp;
    }

    private string Sum(string input)
    {
        dynamic dyn = JsonConvert.DeserializeObject(input);
        SumRequest request = new SumRequest();

        foreach(var value in dyn.Input)
        {
            long temp = Convert.ToInt64(value);
            request.Input.Add(temp);
        }
        var reply = client.Sum(request);
        return reply.Result.ToString();
    }

    private string Remainder(string input)
    {
        dynamic dyn = JsonConvert.DeserializeObject(input);
        RemainderRequest request = new RemainderRequest();
        request.A = dyn.A;
        request.B = dyn.B;

        var reply = client.Remainder(request);
        return reply.Result.ToString();
    }
}

AppContext.SetSwitch("System.Net.Http.SocketsHttpHandler.Http2UnencryptedSupport", true);

重點在於.Net Core 3.*的版本再傳入URL前,必須加入上面的語法,否則會產生錯誤

C# Grpc Server&Client範例

使用Grpc的預設專案,建立一個C#的GrpcServer+Client在同一個專案下。

 所以大致有以下三個動作:

  1. 建立範例Grpc Server專案
  2. 在同一個方案內建立Grpc Client專案
  3. 將共用的.proto檔案copy到Client中
  4. 測試專案

建立Grpc Server

  • 建立Grpc服務專案
  • 設定專案名稱
  • 選擇 .Net Core 3.1版本
  • Server的方案總管畫面
  • 更名Server專案名稱
  • 更改資料夾名稱
  • 編輯方案檔
  • 改寫Server專案路徑
GrpcDemo\Grpc.Server.csproj => Grpc.Server\Grpc.Server.cspro
  • 加入第三方套件參考
Server設定完成,執行沒有問題。

建立Grpc Client

  • 在同一方案中加入新專案(Client)
  • 專案類型選擇主控台
  • 設定專案名稱
  • 同樣選擇 .Net Core 3.1版本
  • 專案建置完成的方案總管截圖
  • 將Proto檔Copy到此
  • 改寫 .proto檔案內容
Server端:改寫option內容
GrpcDemo => Grpc.Server
Server端:加入參考
Client端:改寫option內容
GrpcDemo => Grpc.Client
  • 調整Grpc.Client.csproj
  • 重建方案
  • 修改Client程式碼
static async Task Main(string[] args)
{
await Task.Delay(3000);
using var channel = GrpcChannel.ForAddress("https://localhost:5001");
var client = new Greeter.GreeterClient(channel);
Console.WriteLine("請輸入你的名字...");
string name = Console.ReadLine();
var reply = client.SayHello(new HelloRequest { Name = name });
Console.WriteLine("問候語 : " + reply.Message);
await channel.ShutdownAsync();
Console.WriteLine("按任何一個鍵退出...");
Console.ReadKey();
}
  • 從方案屬性調整起始專案
  • 開始測試
測試成功!!!

2022年6月24日 星期五

C# 靜態物件在不同執行緒產生的問題

 工作中遇到了一個問題,為了加快速度,我將某個基礎函式定義為靜態物件,這個靜態物件中會送POST到某個機器上,並在裡面夾帶Cookie作為認證機制。

例如:

Public static class Test
{
private string cookie;
public void Send(string url, string content )
{
HttpWebRequest request = (HttpWebRequest)WebRequest.Create(url);
request.Method = "POST";
WebHeaderCollection headerCollection = request.Headers;
headerCollection.Add("Cookie", cookie);
request.ContentType = "text/xml";
using (var streamWriter = new StreamWriter(request.GetRequestStream()))
{
streamWriter.Write(content);
streamWriter.Flush();
streamWriter.Close();
}

using (HttpWebResponse response = (HttpWebResponse)request.GetResponse())
{
resp.httpStatus = response.StatusCode;
if (response.StatusCode == HttpStatusCode.OK)
{
using (StreamReader sr = new StreamReader(response.GetResponseStream()))
{
resp.xmlRespone = sr.ReadToEnd();
}

if (!string.IsNullOrEmpty(response.GetResponseHeader("Set-Cookie")))
{
cookie = response.Headers.GetValues("Set-Cookie").ToList().FirstOrDefault();
}
}
response.Close();
}
}
}


TestController:
建構式:
private Test test = new Test();
其他呼叫函式TestSend():
test .Send(<<傳送機台網址>>,"sendContent");

一般情況是測不出問題的,可是某天客戶突然說出現了401回覆。

去看了Log才發現,當頻繁的呼叫這個函式(TestSend()),傳送機台那邊回覆401(沒有權限)。也就是雖然我有設定cookie值作為驗證,但是機器不認得這個驗證值,或者認定這個驗證值不屬於我,因此我沒有權限將資料送到機台處理。

為什麼呢?我百思不得其解,甚至還在考慮是否客戶的網路結構跟公司不同,在分流IP時產生了問題,造成去回不同路?

看了N個log,我才驚愕地發現一個事實。

我的驗證cookie在不同執行緒下,被蓋掉了!!!

從來不知道原來靜態物件是這樣設定的,在Controller中呼叫靜態物件後,它會占用同樣的儲存位置,因此不同執行緒執行時,靜態物件內部的設定值,即使是私有變數也可能會被蓋掉。

果然,當我取消靜態物件的設定,即使呼叫方式沒有改變,也不再出現驗證失敗401的錯誤了。

為防自己忘記,特別寫一下。並非設定私有變數就一定沒有問題,靜態物件的使用、呼叫必須謹慎。以上就是這次的教訓了。


2022年2月21日 星期一

EF Core SELECT WHERE IN 的用法

 很不幸的,最近支援一個專案,平時直接下SQL語法的我,對所謂的EF Core沒啥研究,但是卻遇到這次的架構使用了這個技術。然後,更不幸的是,居然要我想辦法幫忙修改查詢指令。

主要的問題是,每個使用者擁有不同權限,進入後看到的資料也不同,必須查詢多張表格才能整理出來,最終我提供了Table的Id List,讓他們把舊的查詢再加上一個條件,必須是Id List內相同的Id才顯示。

當然,最終這個語法還是我查出來了,特別紀錄起來以免下次遇到。

OrderIdList = List<int>{orderId1,orderId2...};
orders = _context.Orders.Include(o => o.OrdersPlaceMapping).Where(row => OrderIdList.Contains(row.Id)).OrderBy(o => o.Id).ToList();

2022年1月20日 星期四

ASP.NET CORE3.1 使用EF Core處理資料庫問題

建立書本的範例,書本使用的是Asp.Net Core 2.2版本,但考量實際專案改使用Asp.Net Core 3.1版本,然後自然會開始遇到一連串狀況了。目前的進度只到使用EF Core自動建立資料庫與資料表,後續的新增、修改、刪除、查詢功能都還沒開始處理,先記錄目前為止的問題。

  • EF Core需要安裝:
第一個狀況就是EF Core安裝,在書中並沒有說明這一段,猜測可能Asp.Net Core 2.2包含EF Core不須安裝此套件,總之第一個遇上的問題就是該安裝EF Core哪一個版本?
之後在同事的建議下,安裝了5.04版,這邊特別說明6.01需要.NET Core 6以上版本才能安裝,我目前的版本裝不了。

EF Core安裝截圖


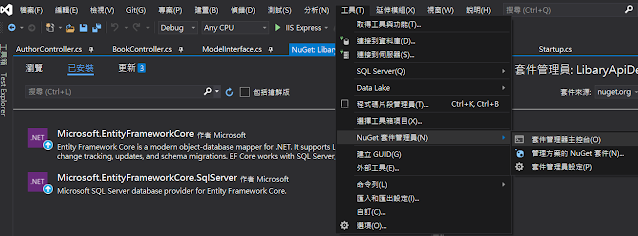
安裝之後我開始依照範例處理DTO、資料庫連線設定等等,然後問題出現了,在Startup.cs的ConfigureServices中加入SQL服務時Error了,原因是找不到我使用的函式,如下圖:

設定使用EF Core做資料庫連線錯誤


  • EF Core相關套件需要安裝:
後來在同事的幫忙下,了解這是因為我少裝了一個套件,EF Core.SqlServer,如下圖:

安裝EF Core的SqlServer相關套件


安裝版本基本是跟EF Core的版本,安裝完剛剛在Startup.cs的錯誤就沒問題了。
接著我按照書上的說明,準備使用Code First方式,通過Migration建立資料庫與資料表。
首先要先找到使用指令的地方,工具/NuGet事件管理員/套件管理器主控台,順道一提因為書籍是簡體版,兩邊翻譯的不同,這個位置讓我找了很久。

使用命令列位置


接著下達命令來建置Migration參考檔案,命令如下:

Add-Migration InitalCreation
然後當然又錯誤了(實際的錯誤訊息忘了,這是我將參考拿掉產生的)。

命令錯誤資訊


查了一陣子,發現又少裝一個套件,EF Core Tools。

安裝EF Core的Tools相關套件


緊接著,執行Add Migration沒有問題成功了,得到一個Migrations的資料夾,裡面設定了資料庫與資料表的建置方式。

於是依照範例繼續準備寫入資料庫中,命令如下:

Update-Database

然後又錯誤了,原來的錯誤訊息好像是和Initial Catalog相關,因為已經無法重現原來的問題,講一下印象中大意是說不可使用Initial Catalog字元,或者使用Initial Catalog有問題之類的。

這個錯誤大概是我找最久的,我當時不再公司只能自己尋找問題,偏偏對這個不熟悉找到的資訊也大多有問題,沒有人幫忙的情況下,最終才發現錯誤訊息的問題跟我考慮和尋找的方向有落差。

原因是我資料庫連線設定錯誤,把設定值放上來。

"DefaultConnection": "Data Source=localhost\\資料庫連線;Initial Catalog=資料庫名稱;Integrated Security=SSPI"

這是我從各式各樣的網頁找的答案拼湊出來的,這個設定值並不是給我目前的狀況使用,但範例原先的設定讓我新增成功卻找不到新增的資料庫,總之結論我把正確的設定值貼上。

"DefaultConnection": "server=localhost\\資料庫連線;database=資料庫名稱;Integrated Security=SSPI"

到此為止終於新增成功,且在資料庫連線工具中找到新增的資料庫了,可喜可賀。

繼續補充之後Migration自動建立假資料的動作

在連線設定繼承DbContext的物件中複寫OnModelCreating函式

protected override void OnModelCreating(ModelBuilder modelBuilder)
{
            base.OnModelCreating(modelBuilder);
            modelBuilder.Entity<AuthorDBDto>().HasData(List<AuthorDBDto>authors);
            modelBuilder.Entity<BookDBDto>().HasData(List<AuthorDBDto>books);
}

工具/NuGet事件管理員/套件管理器主控台

在此輸入指令 Add-Migration SeedData,在Migration資料夾中會多出SeedData的檔案,內容是List中想要新增的資料。然後在輸入指令Update-Database,將資料新增到資料庫中。如下圖:


要注意的是Add-Migration SeedData之後即便把SeedData檔案刪除,仍然已經將資料寫入某個地方,重新填寫資料時,剛剛已經寫入的資料不會寫入新的SeedData檔案。

接著測試自動刪除檔案,先輸入指令Add-Migration RemoveSeededData,在Migration資料夾中會多出RemoveSeededData的檔案,內容是剛剛新增的資料。然後在輸入指令Update-Database,將資料從資料庫中刪除。如下圖:


到此EF Core的測試完畢,真是太好了。

2022年1月6日 星期四

ASP.NET C# Fotify Cross-Site Scripting: Poor Validation(XSS)問題解決

 這次客戶使用Fortify進行掃描,多數的問題都已經解決,或者將公用函式做成.dll檔後,也都通過掃描標準。唯獨標題的問題,從開始到前日一直沒有解決,今天終於處理完畢,所以特別記錄下來。

依照我之前查詢的諸多參考網頁,多數說明解決這個問題的方法就是使用HtmlEncode()處理input,不讓程式執行含有HTML標籤的內容,也避免資料庫存入。

因此我將被掃描出來的地方,只要有被呼叫到的部分,不管input、output全部都使用HtmlEncode()處理,然而這沒有用,Fortify依舊堅持把這段程式掃出來了。

目前解決方法:
input:依舊使用HttpUtility.HtmlEncode()處理。
output:
HtmlSanitizer sanitizer = new HtmlSanitizer();
output = sanitizer.Sanitize(HttpUtility.HtmlDecode(data));

程式碼無法放上來,只能這樣說明,希望下次要是再遇到這樣的問題能夠提供參考。

後續發生一個意想不到的問題,這個第三方套件和Framework4.6.2的版本居然有參考檔會衝突。

原因是客戶不希望保留Nuget參考,希望所有第三方套件全部轉成.dll來參考,加上客戶的Framework版本是4.5升上來的,所以本機執行一直沒有發現錯誤,等到程式發佈到IIS上後居然無法執行。今天找了一整天終於知道有兩個套件參考的dll與4.6.2衝突了,需要改寫web.config設定。

將web.config修改部分放上來,真是始料未及的問題。

  <runtime>

          <assemblyBinding xmlns="urn:schemas-microsoft-com:asm.v1">

<dependentAssembly>

<assemblyIdentity name="AngleSharp.Css" publicKeyToken="XXXXX" culture="neutral"/>

<bindingRedirect oldVersion="0.0.0.0-0.16.3.0" newVersion="0.16.3.0"/>

</dependentAssembly>

                  <dependentAssembly>

                          <assemblyIdentity name="AngleSharp" publicKeyToken="XXXXX" culture="neutral"/>

                          <bindingRedirect oldVersion="0.0.0.0-0.16.1.0" newVersion="0.16.1.0"/>

                  </dependentAssembly>

          </assemblyBinding>

  </runtime>


2021年12月3日 星期五

MS SQL工具改變資料表欄位自動增值失敗問題

今天我發現資料庫沒有建立主Key,且主Key欄位非自動增值造成我新增資料失敗後,便來調整資料庫的欄位設定。 

使用的工具是Microsoft SQL Server Management Studio。

不過當我把主Key調整好,設定自動增值如下圖:

將設定存檔時卻發生錯誤無法調整,如下圖:


最終在同事的幫忙下發現,這個錯誤訊息必須調整『工具』選項中的『設計師』中,把『防止儲存需要資料表重建的變更』這項設定取消。如下圖:


這樣就可以調整資料表的主Key欄位並讓它自動增加數值了。


2021年11月25日 星期四

改變.NET Framework版本

 如何不透過UI直接從檔案更改Framework版本?

原先我都是利用Visual Studio的介面更改Framework的版本,不過這次的專案不知為何改變版本後,Web Reference就發生錯誤,甚至無法編譯。

本來應該設法好好找出Web Reference就發生錯誤的原因,不過由於時程問題,我想到如果不透過介面直接從檔案更改Framework版本,是否可以避免因為重新讀取專案檔,系統檔改寫後編譯錯誤的問題。

終於,那麼更改Framework應該從哪個系統檔處理呢?

基本上就是.csproj檔案。

在這個檔案內容可以找到Framework目前的版本,直接修改版本號碼就可以改變Framework版本。

改變.sln專案檔版本

如何將.sln專案檔提升至2017版本

最近遇到客戶提出了這個要求,順便參考官方文件的說法,整理一下如何提升專案檔版本?

參考網站:https://docs.microsoft.com/zh-tw/visualstudio/extensibility/internals/solution-dot-sln-file?view=vs-2017


先不考慮專案內容是否會有衝突的問題,單純紀錄該如何修改.sln版本。

依照官網文件的說法,基本上相當簡單,只要修改檔案的表頭即可。

下列附上每個不同VS版本的.sln表頭。

  • VS2022

Microsoft Visual Studio Solution File, Format Version 12.00

# Visual Studio Version 16

VisualStudioVersion = 16.0.28701.123

MinimumVisualStudioVersion = 10.0.40219.1


  • VS2019

Microsoft Visual Studio Solution File, Format Version 12.00

# Visual Studio Version 16

VisualStudioVersion = 16.0.28701.123

MinimumVisualStudioVersion = 10.0.40219.1


  • VS2017

Microsoft Visual Studio Solution File, Format Version 12.00

# Visual Studio 15

VisualStudioVersion = 15.0.26730.15

MinimumVisualStudioVersion = 10.0.40219.1


  • VS2013

Microsoft Visual Studio Solution File, Format Version 12.00

# Visual Studio 2013

VisualStudioVersion = 12.0.40629.0

MinimumVisualStudioVersion = 10.0.40219.1

VS2022與VS2019的設定表頭設定基本是相同的,關於這個我暫時沒有找到更詳細的說法,因為我最近修改的版本為VS2013 => VS2017,經過修正之後,客戶那邊確認可以使用。

將官網針對表頭的說明複製上來,若有侵權疑慮請先告知,謝謝!


Microsoft Visual Studio Solution File, Format Version 12.00
定義檔案格式版本的標準標頭。

# Visual Studio 15
Visual Studio 的主要版本, (最近) 儲存此方案檔。 這項資訊會控制解決方案圖示中的版本號碼。

VisualStudioVersion = 15.0.26730.15
Visual Studio 的完整版本, (最近) 儲存的方案檔。 如果解決方案檔是由具有相同主要版本的較新版本 Visual Studio 所儲存,則不會更新此值,以便減少解決方案檔中的流失情形。

MinimumVisualStudioVersion = 10.0.40219.1
可以開啟此方案檔之 Visual Studio 的最小 () 版本。

也就是說,基本上只要置換中間兩行就能將.sln版本更換。

# Visual Studio 15

VisualStudioVersion = 15.0.26730.15

查詢此問題時,還有看到可以將專案拷貝各種不同版本的.sln檔案,方便使用不同的VS版本開啟的說法。

通常專案檔版本還是需要配合客戶需求,所以更改版本是有機會發生的問題,特別記錄下來。


2021年9月7日 星期二

C# ASP.NET web.config的RSA加密

 通常我們會在web.config中放入很多設定值,其中不乏帳密之類的機密資料。按理說,這支檔案是無法被截取的,不過為了安全起見,倘若可以做更多加密處理,也能更加放心。

這次客戶提供的web.config就有加密處理,並且因為沒有RSA Key的原因,整個程式無法順利編譯。因此我將這個RSA加密web.config的方式記錄下來。

使用RAS Key加密,必須用到Visual Studio的一個執行檔(aspnet_regiis.exe),所以必須將cmd用管理者權限執行後,將路徑移動到那個執行檔的資料夾。

C:\Windows\Microsoft.NET\Framework\v4.0.30319,這是我使用的資料夾。

在HelloWorld中加上讀取appSettings的內容,確認加密前後程式可以正常編譯。


[WebMethod]

public string HelloWorld()

{

    string temp = ConfigurationManager.AppSettings["test"];

    return temp;

}


一、以本機的RSA Key加解密:

這個方法比較簡單,不過一旦將檔案移到別的主機上,就會發生最前面所述,整個程式無法編譯的問題,所以自己玩一下可以,並不是那麼實用。

加密:

1.在命令列執行aspnet_regiis.exe -pef appSettings "專案的web.config所在資料夾"

以本機RAS Key加密


2.確認web.config加密後內容

web.config加密後內容


3.編譯執行程式,看看是否可以順利讀到appSettings內容

解密:

1.在命令列執行aspnet_regiis.exe -pdf appSettings "專案的web.config所在資料夾"

以本機RAS Key解密


2.確認web.config是否解密還原最初的內容

二、以固定的RSA Key加解密

1.確認使用本機或是取得其他RSA Key加密

    1.1使用本機的RSA Key加解密

    這應該是最常見的狀態,使用本機的RSA Key加密後,提供這把Key給其他使用者。

aspnet_regiis.exe關於說明建立RSA Key說明


參考上述的說明內容,在命令列執行aspnet_regiis.exe -pc "金鑰名稱" -exp,如下圖。

在命令列執行建立RSA金鑰


之後修改專案的web.config內容,加入一段設定指定金鑰加密的部分。

<configProtectedData>

    <providers>

      <add name="RuitingtechProvider" type="System.Configuration.RsaProtectedConfigurationProvider,System.Configuration, Version=4.0.0.0,  Culture=neutral, PublicKeyToken=b03f5f7f11d50a3a" keyContainerName="金鑰名稱" useMachineContainer="true"/>

    </providers>

  </configProtectedData>

web.config設定特定RSA金鑰加密


在命令列輸入加密命令,aspnet_regiis.exe -pef 加密區段 "web.config資料夾路徑" -prov "RuitingtechProvider"

在命令列輸入使用特定RSA金鑰對web.config特定區域加密


web.config加密後內容


    1.2使用其他裝置密鑰加密
    這邊就不特別實作,大致應該是把金鑰檔匯入本機中,其他的動作應該是差不多的。

確認加密後程式可以正常編譯、執行。

2.確認使用本機或取得其他RSA Key解密
    2.1使用本機特定金鑰解密
    在命令列輸入解密命令,aspnet_regiis.exe -pdf 解密區域 "web.config所在資料夾路徑"
在命令列輸入解密命令


    web.config恢復未加密內容。

    2.2使用其他裝置密鑰解密
    這邊不特別實作,先將金鑰匯入本機中,其他動作應該是差不多的。
將其他裝置金鑰的xml匯入命令參考


3.將RSA Key匯出xml檔案給其他裝置使用
aspnet_regiis.exe -px “金鑰名稱” 金鑰xml路徑 -pri
在命令列輸入匯出xml檔案命令


尋找一下這個位置是否產生了xml的金鑰檔案。


最後補充一下刪除金鑰容器的說明。
 aspnet_regiis -pz "金鑰名稱"


參考網頁:
https://dotblogs.com.tw/wasichris/2016/01/01/235040
https://www.itread01.com/content/1549832402.html
以及C# Asp.Net官方文件